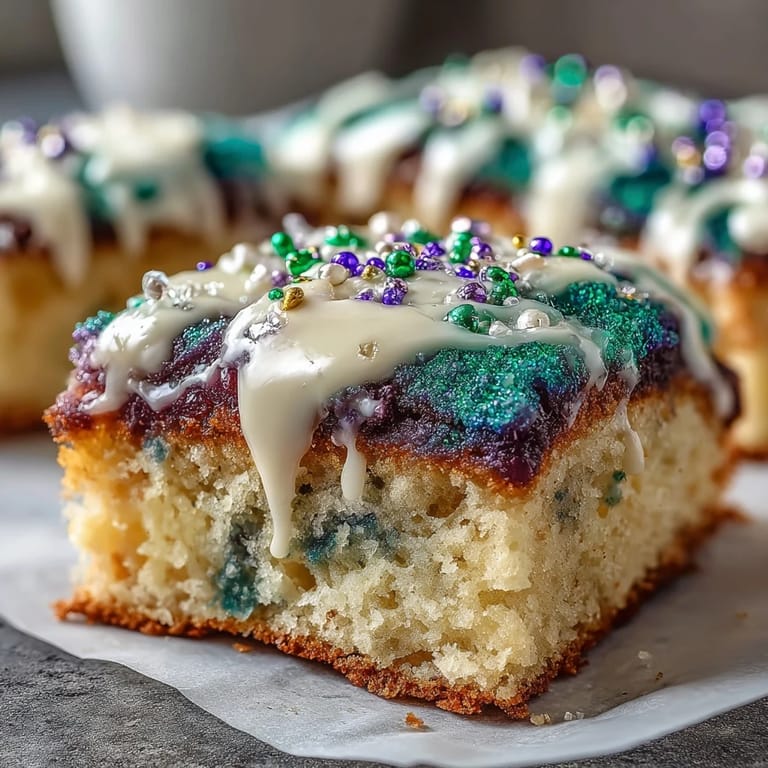
 Pin it
 My cousin texted me a photo of King Cake at a New Orleans bakery, and I stared at those jewel-toned colors thinking, why not make this happen in bar form for our Mardi Gras potluck? The traditional cake seemed intimidating, but a sheet pan of buttery sugar cookies with royal icing and cascading sprinkles felt achievable and somehow even more fun. That afternoon, my kitchen smelled like vanilla and lemon while I spread purple, green, and gold across cooling bars, and I realized this was the dessert I'd been craving without knowing it.
I brought a tray to a dinner party where someone's grandmother was visiting from Louisiana, and she took one bite, paused, and said it reminded her of something her mother used to make. That moment—watching her close her eyes and smile—taught me that food carries memory in ways that transcend recipes, and these bars became something I make whenever I want to give people that feeling.
Ingredients
- Unsalted butter (1 cup): The foundation of everything delicious here; room temperature means it creams properly and gives you that tender crumb.
- Granulated sugar (1 1/4 cups): This sweetness isn't overwhelming because the lemon zest keeps it balanced and bright.
- Large eggs (2): These bind everything together and give the bars lift and structure without making them cake-like.
- Vanilla and almond extracts: The vanilla is non-negotiable, but the almond is your secret whisper of flavor that makes people ask what's different.
- All-purpose flour (2 1/2 cups): Measure by weight if you can; it prevents dense, heavy bars that nobody wants.
- Baking powder and salt: Just enough to wake up the dough without overwhelming the delicate flavors.
- Ground cinnamon (1/4 teaspoon): A tiny pinch that echoes the warmth of traditional King Cake without announcing itself.
- Lemon zest (1): This is what makes these bars sing; it brightens everything and feels almost sophisticated for something so simple.
- Powdered sugar (2 cups): The base of your icing, which should be silky and spreadable, not stiff.
- Milk (2-3 tablespoons): Add slowly until you reach pourable consistency; too much makes it run off the bars.
- Purple, green, and gold sanding sugar: These aren't just toppings—they're your ticket to Mardi Gras magic and what makes people actually want to eat these at a party.
Tired of Takeout? 🥡
Get 10 meals you can make faster than delivery arrives. Seriously.
One email. No spam. Unsubscribe anytime.
Instructions
- Set the stage:
- Preheat your oven to 350°F and line a 9x13 pan with parchment, letting some hang over the edges so you can lift the whole thing out later. This small step saves you from picking at corners and frustration.
- Cream butter and sugar:
- Beat them together for 2-3 minutes until it looks pale and fluffy, almost cloud-like; this is where air enters the dough and makes everything tender. If you stop too early, you'll have denser bars.
- Bring in the eggs:
- Add them one at a time, letting each one fully incorporate before the next, then mix in your extracts and lemon zest. The mixture should look smooth and slightly thick, almost like pale mousse.
- Combine dry ingredients:
- In another bowl, whisk together flour, baking powder, salt, and cinnamon to distribute the leavening evenly. This prevents pockets of baking powder that taste bitter.
- Bring it together:
- Fold the dry mix into the wet ingredients gently, stirring just until combined; overmixing develops gluten and makes the bars tough and chewy instead of tender. Your dough should look smooth but not overworked.
- Spread and bake:
- Press the dough evenly into your prepared pan using a spatula, then bake for 22-25 minutes until the edges are lightly golden and the center feels set when you touch it. The bars continue cooking slightly as they cool, so don't overbake.
- Cool completely:
- Let them sit in the pan on a wire rack until fully cooled; this is important because icing on warm bars will melt and slide off. Use this time to make your icing.
- Create the icing:
- Whisk powdered sugar, milk, and vanilla together until it's smooth and pourable but not runny. The consistency should be like thick cream, spreadable but not stiff.
- Ice and decorate:
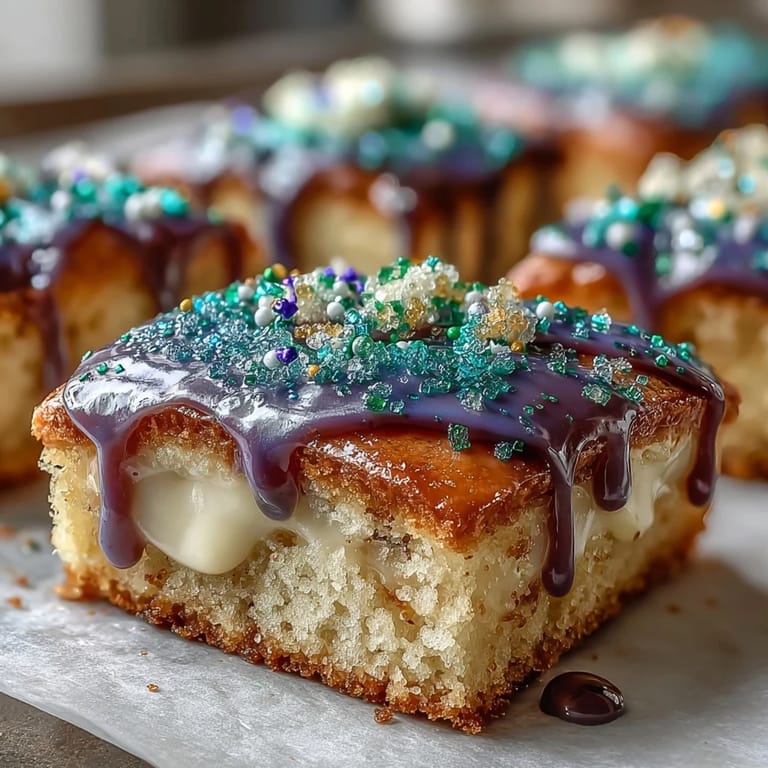
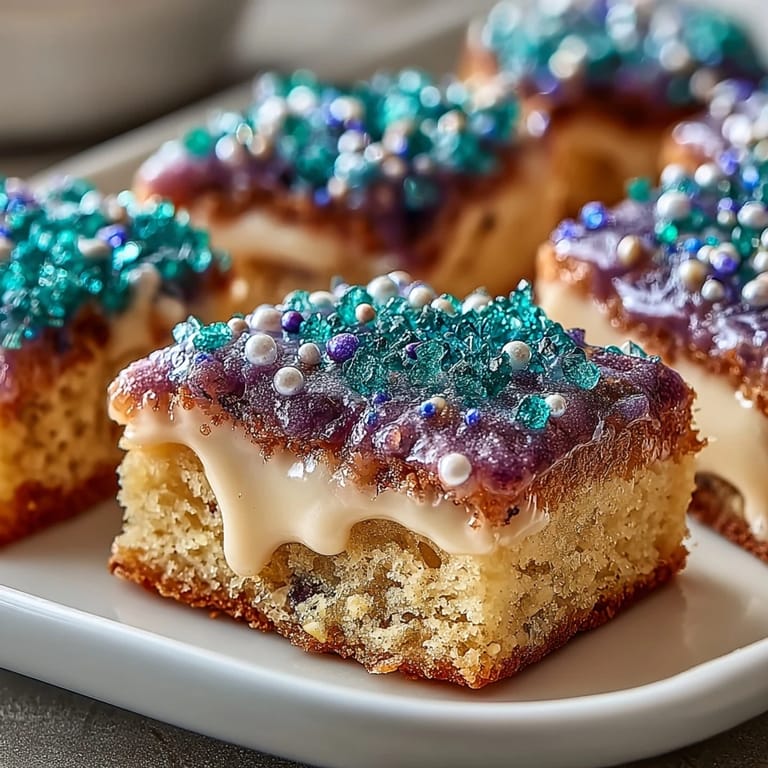
- Spread icing evenly over the cooled base, working quickly, then immediately sprinkle your purple, green, and gold sugars in sections or stripes while the icing is still wet. Once the icing sets, the sprinkles won't stick.
- Set and serve:
- Let the icing set for about 30 minutes, then slice into 24 bars using a sharp knife or bench scraper. Clean your knife between cuts for neat edges.
 Pin it
 A friend's five-year-old called these bars 'treasure cookies' because of the colors, and suddenly I understood why people make food for celebrations—it's not about perfection, it's about creating something that makes ordinary moments feel special. These bars do that without requiring you to be a pastry chef.
Flavor Variations to Try
The lemon-almond base is classic, but I've experimented with orange zest, which gives a slightly different brightness, and one year I added a pinch of nutmeg to echo traditional King Cake spices. You can also swap the almond extract for rum extract if you're cooking for adults only, which adds a subtle depth that people notice but can't quite name. The beauty of these bars is they're flexible enough to adapt to your mood or pantry while staying true to their spirit.
Make-Ahead and Storage Magic
I've made these bars the day before a party and kept them in an airtight container, and honestly they taste even better once the flavors have settled together overnight. The icing stays put, the bars don't dry out, and you remove one major stress from party day. They'll keep for 1-2 days easily, though they rarely last that long once people discover them.
Serving and Party Tips
These bars are the perfect party food because they're handheld, festive without being fussy, and they photograph beautifully for all those Mardi Gras posts. I arrange them on a platter and people gravitate toward them instantly, which means they're both delicious and impressive-looking. If you want to play with tradition, you can hide a plastic baby or whole almond in one bar, but always warn your guests first so nobody's surprised.
- Stack them on a tiered serving stand to make them look like a bakery display at home.
- You can cut these into smaller squares if you're serving as party appetizers alongside other desserts.
- They travel well in a box, so these are excellent for potlucks where you want something that arrives looking perfect.
 Pin it
 These bars remind me that celebration food doesn't need to be complicated, just intentional and made with a little color and joy. They've become my go-to whenever I want to show up somewhere with something that makes people smile.
Recipe FAQs
- → What flavors are featured in the bars?
The bars combine lemon zest and optional almond extract for a subtle but layered sweetness beneath the vanilla icing.
- → How do I achieve vibrant icing colors?
The icing remains white but is topped with purple, green, and gold/yellow sanding sugars or sprinkles to create bright, festive colors.
- → Can these bars be made in advance?
Yes, you can prepare and bake the bars 1–2 days ahead. Store them in an airtight container to maintain freshness.
- → What is the texture of the sugar cookie base?
The base is soft and buttery with lightly golden edges, offering a tender yet sturdy foundation for the icing and toppings.
- → Are there ingredient swaps for allergens or preferences?
You can omit almond extract for nut allergies and swap lemon zest with orange zest to vary the citrus notes.
- → How long should the icing set before serving?
Allow the icing to set for about 30 minutes at room temperature before slicing to ensure a neat finish.