 Pin it
 My mother always said that the best desserts were the ones that looked impossible to make but tasted like pure joy. Years ago, I watched her crack eggs with such precision, beating them into clouds while humming to herself, and I realized pavlova wasn't just about impressing guests—it was her quiet way of saying she cared. Now when I make this crisp-yet-marshmallow creation for Mother's Day, I think of her hands guiding mine through that first meringue, teaching me that sometimes the simplest ingredients create the most magical results.
The first time I nailed this pavlova perfectly was completely by accident. It was a humid spring morning, the kind where nothing usually works, but I'd forgotten to check the weather forecast and just started baking anyway. When that meringue came out of the oven with the perfect shatter-and-give texture, I called my sister immediately—she laughed and said some things just want to be made, especially when love is behind it.
Ingredients
- Egg whites (4 large, room temperature): The foundation of everything—they need to be truly clean and at room temperature because cold eggs won't whip to their full potential.
- Superfine sugar (1 cup): This dissolves completely into the meringue, creating that glossy finish; regular sugar leaves little grains that feel gritty.
- Cornstarch (1 tsp): The secret ingredient that helps stabilize the meringue and gives you that marshmallow-soft center everyone loves.
- White vinegar (1 tsp): Sounds odd, but it strengthens the egg whites and creates that signature tender interior texture.
- Pure vanilla extract (1 tsp): Always use real vanilla—imitation changes the flavor in ways you'll notice on this delicate canvas.
- Heavy whipping cream (1 cup, chilled): Cold cream whips faster and holds better; let it sit in the fridge while the pavlova cools.
- Powdered sugar (3 tbsp total): Creates a silky sweetness without any graininess in the cream or on top.
- Mixed berries (4 cups): Buy them the morning of if possible; they're most vibrant and juicy when fresh, and their tartness balances the sweetness perfectly.
Tired of Takeout? 🥡
Get 10 meals you can make faster than delivery arrives. Seriously.
One email. No spam. Unsubscribe anytime.
Instructions
- Set up your space:
- Preheat your oven to 250°F and line a baking sheet with parchment paper, then use a pen or your mixer bowl to trace a 9-inch circle as a guide. This low temperature is key—it allows the meringue to dry out without browning, keeping it pale and delicate.
- Whip the egg whites:
- In a completely dry, grease-free bowl, beat the egg whites with a pinch of salt until soft peaks form, where the foam holds a gentle wave but tips curl over when you lift the beater. Start on medium speed and gradually increase as the whites get foamy; this prevents splashing and helps build structure.
- Create the glossy magic:
- Add the superfine sugar one tablespoon at a time while the mixer keeps running, beating for 5-6 minutes total until the meringue becomes thick, glossy, and forms stiff peaks that stand straight up. If you rush this step or add sugar too fast, you'll end up with a grainy mixture instead of that cloud-like texture.
- Fold in the extras gently:
- Remove the bowl from the mixer and use a spatula to gently fold in the cornstarch, white vinegar, and vanilla extract, being careful not to deflate all those beautiful air bubbles you've just created. You want to fold, not stir—turn the spatula gently through the center, scrape along the bottom, and bring it up and over the top.
- Shape the nest:
- Spoon the meringue onto your parchment-lined sheet within the traced circle, then use the back of a spoon or spatula to create slightly raised edges like a nest, leaving a shallow well in the center. The raised edges will brown slightly and add visual interest, plus they hold the cream beautifully.
- Bake low and slow:
- Bake for 1 hour 15 minutes at 250°F until the meringue looks pale ivory and feels crispy on the outside when you gently tap it. Turn off the oven, crack the door open about 2 inches, and let it cool completely inside—this gradual temperature change prevents cracking and keeps the interior soft.
- Whip the cream topping:
- While the pavlova cools (this takes at least an hour), remove your chilled cream from the fridge and whip it with powdered sugar and vanilla until soft peaks form. Don't overbeat or you'll end up with butter; stop as soon as the cream holds its shape with gentle peaks.
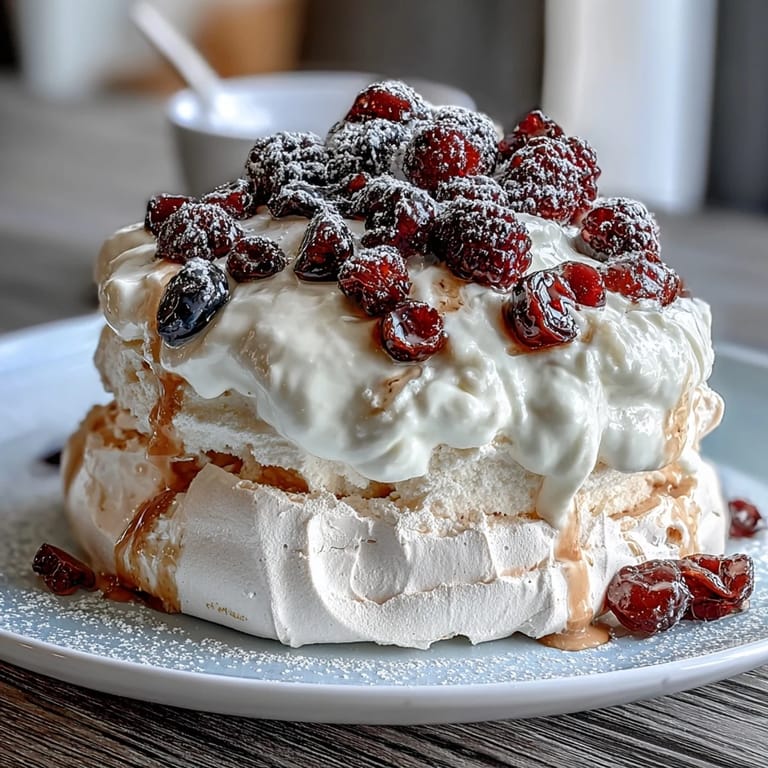
- Assemble the beauty:
- Once the meringue is completely cool, carefully transfer it to your serving platter, spread the whipped cream generously over the top and into that nest, then arrange your fresh berries in whatever pattern makes you happy. Add fresh mint leaves if you have them and dust lightly with powdered sugar just before serving.
 Pin it
 I'll never forget serving this to my mother on her birthday, watching her face light up when she saw it, then hearing that little crack when she broke through the crispy shell with her spoon. That sound, followed by her expression as she bit into the soft center and fresh berries, was worth every careful fold and every minute of waiting for it to cool. Some desserts feed the body; this one feeds something deeper.
The Meringue Magic Explained
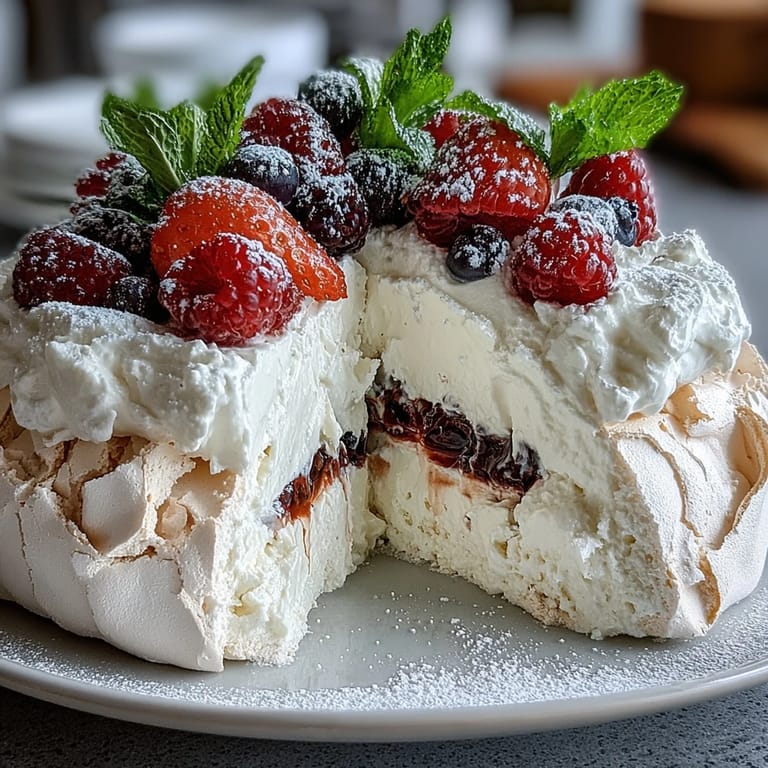
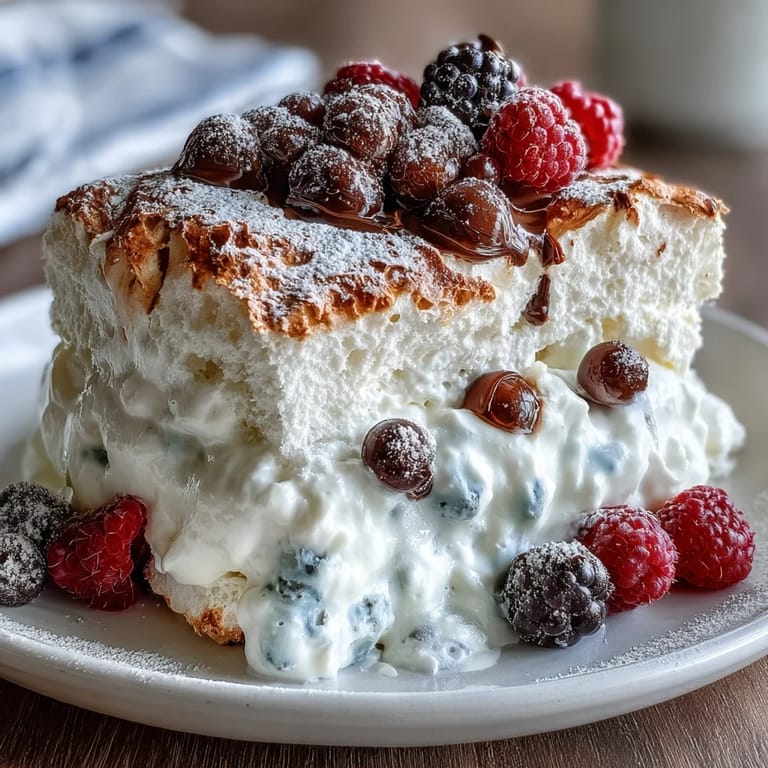
The pavlova is really three textures in one—a crispy exterior that shatters, a marshmallow-soft interior, and then the luxurious cream and bright berries on top. Understanding why each step matters changed how I approach this recipe. The cornstarch and vinegar aren't just random ingredients; they're what transform simple beaten eggs into something with actual structure that can hold its shape for hours without collapsing.
Timing and Make-Ahead Magic
One of the best things about pavlova is that the meringue itself can be made a full day ahead and stored in an airtight container, which takes enormous pressure off Mother's Day morning. I learned this the hard way when I made one the night before and stressed about it being ruined, only to discover it was actually crispier and better. The cream should be whipped within a few hours of serving, but everything else can be prepared with ease.
Berry Selection and Variations
While mixed berries are traditional and absolutely gorgeous on top of white meringue, I've experimented with so many variations over the years. In summer, I sometimes use sliced peaches and raspberries; in winter, I've topped it with kiwi slices and pomegranate seeds. The important part is choosing fruits that look beautiful together and add a tartness that cuts through all the sweetness.
- For a chocolate lover's version, fold 2 tablespoons of sifted cocoa powder into the meringue before baking and it becomes an entirely different experience.
- If berries aren't in season, fresh passion fruit pulp or mango slices work beautifully and feel just as elegant.
- Always arrange your berries right before serving so they stay fresh and don't weep juice into the cream.
 Pin it
 Making pavlova for someone special is really about showing them that you took time to learn something delicate and unfamiliar, and you did it just for them. That's the real gift.
Recipe FAQs
- → How do I achieve a crisp meringue shell?
Whip egg whites to stiff peaks and bake the meringue at a low temperature slowly, allowing it to dry thoroughly.
- → Can I substitute the mixed berries?
Yes, seasonal fruits like kiwi, peaches, or passionfruit work well as flavorful alternatives.
- → How do I prevent the meringue from cracking?
Cool the pavlova gradually in the oven with the door slightly ajar to reduce temperature shock and cracking.
- → What gives the meringue its soft center?
The gentle folding of cornstarch and vinegar into the egg whites helps create the marshmallow-like interior.
- → Is this suitable for gluten-free diets?
Yes, the pavlova contains no gluten and is safe for gluten-free diets.